Every pad setting screen has common fields:
<Ch04: SnareH  >
Note:  D2    38
where:
- CH04: - input number
- SnareH - input name where H or B stands for Head or Bow (for even inputs) and R or E stands for Rim or Edge (for odd inputs),
- Note: - pad setting name
- D2 38 - setting value
Next screen ChXX: PadName->Name:
<Ch04:Snare1  H>
Name:Snare
Input name. Every input can have a custom Name set from a predefined list of names. On Head/Bow inputs the custom name has cymbal 'H' appended at the end, on Rim/Edge inputs the custom name has cymbal 'R' appended at the end.
Next screen ChXX: PadName->Disabled:
<Ch04: SnareH  >
Disabled:    No
If you don't use the input set Set Disabled to Yes. Default is No (input is enabled).
Next screen ChXX: PadName->MNote:
<Ch04: SnareH  >
MNote: D2    38
Master note. You can use MNote to easily set all input's notes in one place. It shows the current Note of the input and if changed it sets Note, ANote, PNote (and DBNote if it is a rim/edge input) to the same value.
Next screen ChXX: PadName->Note:
<Ch04: SnareH  >
Note:  D2    38
Input's note. D2 is note name and 38 is MIDI note number.
Next screen ChXX: PadName->ANote:
<Ch04: SnareH  >
ANote: D2    38
Input's alternating note. If it is different from Note then the note values will be alternating between Note and ANote for every hit. By default it is equal to Note.
Next screen ChXX: PadName->PNote:
<Ch04: SnareH  >
PNote: D2    38
Input's note for "pressrolls". If a "pressroll" is detected then the note values will be taken from PNote rather than from Note/ANote. See also PressRoll Time in Miscellaneous settings.
Next screen ChXX: PadName->Channel:
<Ch04: SnareH  >
Channel:     10
Input's MIDI channel. Default is 10 on all channels.
Next screen ChXX: PadName->Function:
<Ch04: SnareH  >
Function:Normal
Function of the input. It can be set to Normal, PrgChg or CutOff. Default is Normal.
When set to PrgChg it has no effect on Head/Bow inputs. On switch type Rim/Edge inputs this option activates Program Change support. To activate the Program Change support:
1. Configure the input either as a dual piezo/switch pad or as a Yamaha style 3 zone cymbal.
2. On a Rim/Edge input set Function to PrgChg.
3. Set ANote to a number which will limit the Program Change lowest number.
4. Set PNote to a number which will limit the Program Change highest number.
Pressing the edge switch will send MIDI Program Change messages on each press in the upwards direction between ANote and PNote values. Pressing the bell switch (if the edge and bell switches are wired as in a Yamaha style 3 zone cymbal and configured accordingly) will send MIDI Program Change messages on each press in the downwards direction between ANote and PNote values. Of course, it doesn't have to be a real Yamaha type 3 zone pad/cymbal, it just needs switches connected to the rim/edge input as in a Yamaha type 3 zone cymbal, i.e. one switch connected directly and the second switch connected over a 10k resistor. It will work with only one switch as well but it will only cycle in upwards direction going to a ANote value again after reaching PNote value. Sent kit (PC number + 1) is shown on the LCD when Program Change message is sent.
When set to CutOff the 'ANote' setting changes it meaning to 'cut off' level - hits with velocities below level set in 'ANote' will not trigger Note On/Off messages.
Next screen ChXX: PadName->Curve:
<Ch04: SnareH  >
Curve:  Log1
Hit level curve. Sets input signal strength to MIDI level adaptation function for the input. Can be set to Linear, Log1, Log2, Log3, Exp1, Exp2, S1, S2, Strong1, Strong2, Max.
Next screen ChXX: PadName->ComprLvl:
<Ch04: SnareH  >
ComprLvl:     0
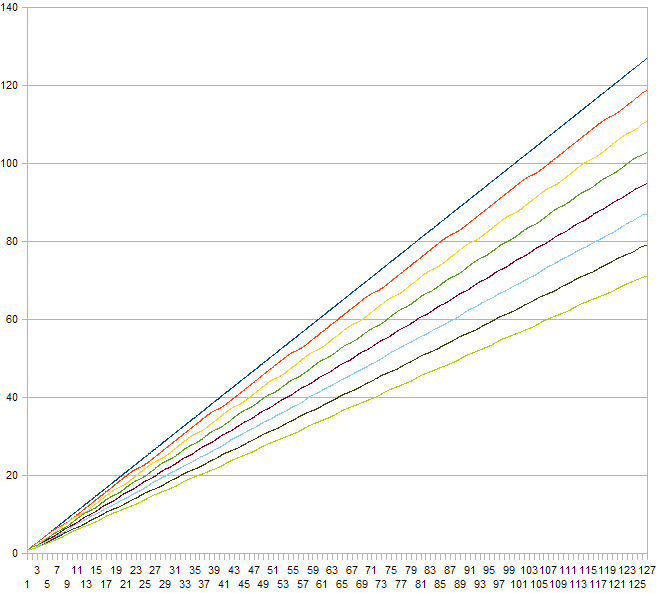
Compression level on the input. Can be set between 0 and 7. Here is an illustration of the effect this setting has on a MIDI note velocity depending on the applied compression level (0 - top line, 7 - bottom line) and input hit strength with a Linear curve setting:
Next screen ChXX: PadName->LvlShift:
<Ch04: SnareH  >
LvlShift:     0
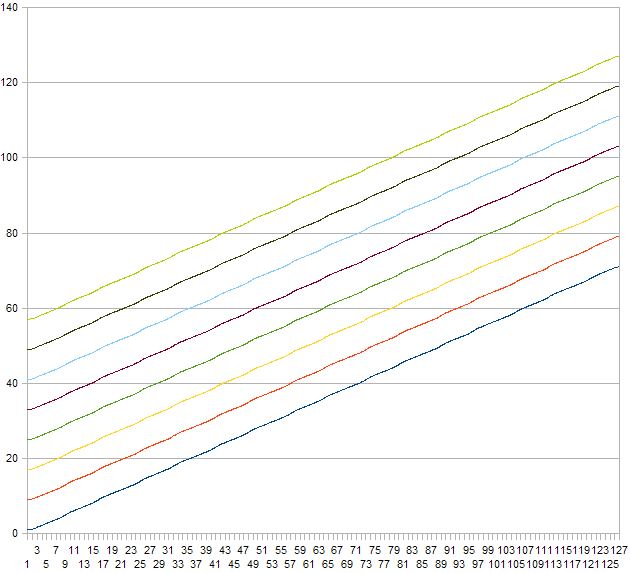
Level shift on the input. Can be set to 0, 8, 16, 24, 32, 40, 48 or 56. Here is an illustration of the effect this setting has on a MIDI note velocity depending on the applied level shift (0 - bottom line, 56 - top line) and input hit strength with a Linear curve setting and compression level 7:
Next screen ChXX: PadName->Xtalk:
<Ch04: SnareH  >
Xtalk:        2
Crosstalk suppression level. Can be set between 0 (no crosstalk suppression) and 7 (strongest crosstalk suppression). If the drum kit has parasitic vibrations transmitted from one pad to another it can trigger signals on pads which were not hit thus producing false MIDI signals. Adjusting this setting you can try to mitigate this problem. Be warned that with a poorly built kit the crosstalk suppression will not help to avoid the problem.
Next screen ChXX: PadName->XtalkGrp:
<Ch04: SnareH  >
XtalkGrp:     0
Crosstalk suppression group of the input. Can be set between 0 and 7. By default all inputs are placed into the same group meaning that the Xtalk setting will be evaluated against signals from all pads. If some of your pads are physically/mechanically isolated you can place pads into 8 different Xtalk groups so that the Xtalk setting only evaluated against within the same group thus avoiding unnecessary suppression.
Next screen ChXX: PadName->Threshold:
<Ch04: SnareH  >
Threshold:   30
For piezo inputs: Input threshold level. Sets at what minimum (relative electrical) level a signal will be detected as a hit. This is one of the main settings effecting overall performance of the drum kit and the best actual value depends on types of pads used. It may take a while to find the best value.
For switch Rim/Edge inputs: Input switch threshold. Sets below which level the switch is detected as hit/pressed. Note that on the switch Rim/Edge inputs actual velocity is determined by signal from a piezo on a Head/Bow input. The best way to set a correct threshold on a switch input is to use MIDI-OX to monitor 'aftertouch' MIDI messages. With a proper threshold value you should see 2 or 3 (dual zone or 3way/3 zone pad) 'aftertouch' on' MIDI messages when you press the switch and 2 or 3 'aftertouch off' MIDI messages when you release the switch.
Next screen ChXX: PadName->Gain:
<Ch04: SnareH  >
Gain:         4
Gain level for the input. Can be set between 0 and 8. Lower value makes the input less sensitive, higher value makes the input more sensitive. Set it lower for 'hot' pads (pads which produce stronger electrical signals), set it higher for 'cold' pads (pads which produce weaker electrical signals).
Next screen ChXX: PadName->HiLvlAuto:
<Ch04: SnareH  >
HiLvlAuto:  Yes
When set to Yes, MegaDrum tries to auto adjust HighLevel for the input. Can be used for an initial setup to get a sense how 'hot' or 'cold' the pad is. After this, set it to No and adjust HighLevel manually using the auto detected level as a guidance.
Next screen ChXX: PadName->HighLevel:
<Ch04: SnareH  >
HighLevel:  855
High (top) level of the input. Signals with relative electrical levels between Threshold and HighLevel will produce MIDI notes with velocities between 1 and 127 (provided both ComprLvl and LvlShift are set to 0). Any signals with relative electrical levels above HighLevel will produce MIDI notes with velocity 127. The further Threshold and HighLevel are apart the better, provided you can reliably get MIDI notes with velocity 127 with strongest hits. Having said that, you will lose almost no dynamics until when HighLevel-Threshold<200~300. If you set HighLevel to maximum, 1023, and still easily get MIDI notes with velocity 127 you probably have a very 'hot' pad and you may lose hit dynamics. Try lowering Gain. If it doesn't help will probably need to use a voltage divider on the input. Don't be scared, a voltage divider is just a trim potentiometer which lowers input signal.
Next screen ChXX: PadName->Retrigger:
<Ch04: SnareH  >
Retrigger:    8
Retrigger period in milliseconds for the input. Determines how many milliseconds must pass after a previously detected signal for a new signal to be detected to prevent a 'machine gun' effect or false triggering due to vibration after a hit. As a Threshold setting this is one is one of the most important parameters and it may take some time to find the best value. Ideally it should be set as low as possible and let 'Dynamic Threshold' to combat the 'machine gun' and false triggering. But if even with highest Dynamic Threshold Levels and Dynamic Threshold Decay times you still get these unwanted effects you may need to raise Retrigger level. On DIY pads and cymbals I have Retrigger set between 4 and 12 milliseconds. Setting it too high will prevent you from doing fast drum rolls.
Next screens ChXX: PadName->DynLevel and PadName->DynTime:
<Ch04: SnareH  >
DynLevel:     5
<Ch04: SnareH  >
DynTime:     32
Dynamic Threshold level and Dynamic Threshold decay time for the input. Also two very important parameters. Raising both DynLevel and DynTime will tell MegaDrum to suppress false triggering (crosstalks between inputs, double triggering) harder. Raising them too high may cause MegaDrum to miss some hits on fast/press rolls. DynLevel sets how hard MegaDrum will try to suppress false triggering. DynTime sets for how long MegaDrum will try to suppress false triggering. For most rubber type pads/cymbals DynLevel between 8 and 15 and DynTime between 8 and 20 should produce the best results. For mesh type pads it may be needed to raise DynTime above 20 and up to 60.
Next screen ChXX: PadName->ExtrFals:
<Ch04: SnareH  >
ExtrFals:    No
Extra false triggering suppression. Disabled by default. Can be enabled for some pads/cymbals with very long inconsistent after hit vibration but it will negatively affect pressrolls and very fast rolls. Ignored on Atmega.
Next screen ChXX: PadName->RollSmth:
<Ch04: SnareH  >
RollSmth:      0
Rolls smoothing level. Disabled by default (0) and can be set to 1 (lightest smoothing), 2 or 3 (strongest smoothing). When set to 1, 2 or 3 the MIDI Note On levels will be smoothed if hits from the same input come within Note Off Delay. Ignored on Atmega.
Next screen ChXX: PadName->MinScan:
<Ch04: SnareH  >
MinScan:     20
Minimum scan time for the input. Measured/shown in 1/10th of millisecond. Can be set between 1 and 100 (0.1 - 10ms). When MegaDrum detects a signal above Threshold/Dynamic threshold, it will keep sampling it for MinScan period of time before marking the signal as registered and making it ready to be sent over MIDI next MegaDrum scans (scan time is set by 'Latency') all channels for registered signals.
Lowering it will improve Latency (MegaDrum latency is between Latency and and Latency+MinScan) and may worsen level accuracy. Raising it will worsen Latency and may improve level accuracy. Generally for rubber type pads/cymbals setting MinScan to 20 (2ms) is enough for proper signal level detection. For mesh type pads you may need to raise MinScan to 30~50 - the bigger mesh type pads the higher MinScan is required for proper signal level detection..
Next screen ChXX: PadName->DualHead for Head/Bow input or PadName->Type for Rim/Edge inputs:
<Ch04: SnareH  >
DualHead:   Yes
For Head/Bow inputs: Can be set to No, Yes or 3Way.
If set to No, Head/Bow and Rim/Edge inputs are treated as separate pads.
If set to Yes, Head/Bow and Rim/Edge inputs are treated as parts of the same dual zone pad or as parts of the same 3 zone pad, e.g. Yamaha style 3 zone cymbals. See more about 3 zone pads below in BNote and BThreshold settings.
If set to 3Way, Head/Bow and Rim/Edge inputs are treated as Bow and Bell inputs of 3way pads, e.g. 3way Roland style cymbals, and the next Rim/Edge input is treated as an edge input of the same pad.
<Ch04: SnareR  >
Type:     Piezo
For Rim/Edge inputs: Can be set as either Piezo or Switch. Sets the type of a trigger connected to the input. You can set it as Switch only if the Head/Bow input DualHead parameter is set to Yes or 3Way.
Next screen ChXX: PadName->3rd Dsbld (only available on Rim/Edge inputs):
<Ch04: SnareH  >
3rd Dsbld:   No
If you don't use 3rd zone set Set 3rd Dsbld to Yes. Default is No (3rd zone is enabled).
Next screen ChXX: PadName->MBNote (only available on Rim/Edge inputs):
<Ch04: SnareR  >
MBNote:C#3   49
Master note for the 3rd zone/rim shot. You can use MBNote to easily set all BNote, ABNote and PBNote values in one place. It shows the current BNote and if changed it sets BNote, ABNote and PBNote (but not DBNote) to the same value.
Next screen ChXX: PadName->BNote (only available on Rim/Edge inputs):
<Ch04: SnareR  >
BNote: C#3   49
For piezo/switch/switch 3 zones pdas/cymbals: Note number for the 3rd zone of a 3 zone Yamaha style pad/cymbal.
For piezo/piezo dual zone pads: Note number for a rim shot. Set equal to a note number of the rim to disable rim shot functionality. Note that this feature is still experimental. Right settings for HighLevel on both the head and the rim inputs is very important. Raising MinScan on both the head and the rim can also improve rim shot reliability.
Next screen ChXX: PadName->ABNote (only available on Rim/Edge inputs):
<Ch04: SnareR  >
ABNote:C#3   49
3rd zone alternating note. If it is different from BNote then the note values will be alternating between BNote and ABNote for every hit. By default it is equal to BNote.
Next screen ChXX: PadName->DBNote (only available on Rim/Edge inputs):
<Ch04: SnareR  >
DBNote:C#3   49
For piezo/switch 2 or 3 zones pads/cymbals only. Dampened note value. If a pad/cymbal is hit when the rim/edge switch is pressed then the note value is taken from DBNote rather than from Note of the head/bow input. By default it is equal to Note of the head/bow input.
Next screen ChXX: PadName->PBNote (only available on Rim/Edge inputs):
<Ch04: SnareR  >
PBNote:C#3   49
3rd zone's note for "pressrolls". If a "pressroll" is detected then the note values will be taken from PBNote rather than from BNote/ABNote. See also PressRoll Time in Miscellaneous settings.
Next screen ChXX: PadName->DualMidPoint (only available on Rim/Edge inputs):
<Ch04: SnareR  >
DualMidPoint 15
For dual piezo/piezo pads: Midpoint is used to fine tune separation between head and rim hits. It can be set between 0 and 15. The higher the value the easier to get rim hits and more difficult to get head hits and vice versa.
For dual piezo/switch pads this option is disabled.
Next screen ChXX: PadName->DualMidWidth (only available on Rim/Edge inputs):
<Ch04: SnareR  >
DualMidWidth 15
For dual piezo/piezo pads: The width of signals for rim shots. It can be set between 0 and 15. The higher the value the easier to get rim shots and more likely to get false rim shots on head or rim hits and vice versa.
For dual piezo/switch pads this option is disabled.
Next screen ChXX: PadName->BThreshold (only available on Rim/Edge inputs):
<Ch04: SnareR  >
BThreshold:  15
For piezo/switch/switch 3 zones pdas/cymbals:Input switch threshold for the 3rd zone of a 3 zone Yamaha style pad/cymbal. Sets below which level the Bell switch is detected as hit/pressed. This level must be lower than Threshold level of the Rim/Edge input of a switch type trigger. If the connected pad is dual zone piezo/switch type or a 3way Roland cymbal, BThrshold must be set to 0 to prevent false triggering of Bell notes or alternatively set all Bell Notes (BNote, ABNote, PBNote) equal to the Edge/Rim Notes.
For dual piezo/piezo pads this option is disabled.